There are some words that you often see people say or write when talking about post-editing with software (both software integrated on the phone and the computer such as Photoshop or Lightroom). Many of you ask to begin to learn, know what it is for the first step of photo editing before sharing online, I would like to write down the basics for you. In the following, I will make a video and share what specific steps do with a photo depending on the genre.
Then slowly you will have a process according to how each person handles it.

flexible
More will get used to, less will forget.


* Tips: Thóiquen
* Đèn ngủ Yeelight, có móc, nam châm, pin sạc, giá chỉ 269k
Saturation affects the intensity of all colors in the image, Vibbrance only affects darker colors, not changing skin tones and saturated colors. I personally rarely use this tool, if any, to adjust each color channel separately if necessary.
This tool is often very newbies, pull for visual satisfaction in color, just feel comfortable, it is difficult to say. A time playing photos and processing photos automatically will automatically adjust the perceived softer natural colors.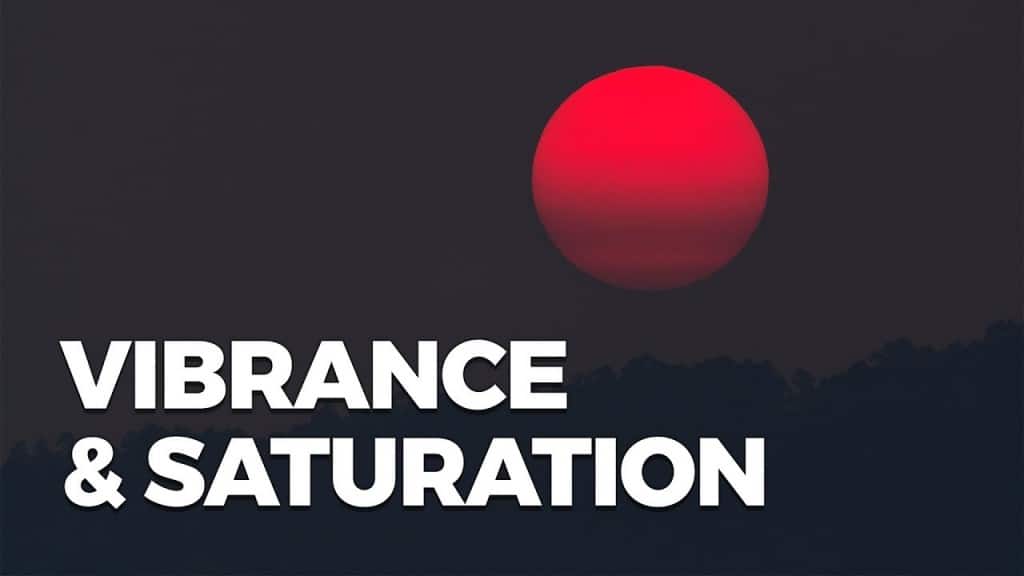
* [Trick] How to download standard Windows 10 1903 ISO from Microsoft
A larger image always needs higher sharpness. A photo with low sharpness when zoomed more than it will no longer clearly show the details in the image.
Image viewing distance also affects the visual perception of the image's sharpness.
The closer it is to the image, the more sharpness is needed, the more proportional to the enlargement and observation at a distance. So, when post-processing a sharpen image, note theitem purpose of use, maybe how to optimize the sharpness is not needed as when looking at photos on the computer screen.
This can be done in-camera during shooting or may vary in post-processing and will be easier when you shoot RAW images.
Learn histogram charts that help you adjust lighting harmoniously for photos, taking advantage of the function of the score 1 Curves / Tone Curve more.

 Common noise is grainy in photos, for a variety of reasons, but often occurs due to the use of high ISO sensitivity in low light situations. We always try to minimize the noise in the image, taken with the lowest ISO in the standard range.
The Noise tool helps to reduce the noise somewhat during post-editing, and sometimes a small amount of noise can improve sharpness.
 As its name suggests, it is a technique that combines two or more versions of the same scene in post-processing software to create the final image, resulting in better exposure (mixing exposure parameters),
The image depth (Dof) is thicker and the whole scene is mixed.
 Masks are a great tool when dealing with post-production, especially in Photoshop, when working with layers. Thanks to the mask allow selecting a class to handle the editing of styles without affecting other layers.
Learn and master the use of this tool to help you quickly improve post-production techniques.
This technique is more often used in black-and-white photos, aiming to direct the viewer's attention to one topic while reducing distractions on other sub-topics.

 The dynamic range of an image refers to the amount of light received in a recorded scene. High HDR means denoting a wide or narrow range of light in a scene, the strip recognizing the light in the highlights and shadow areas with differences and the ability to record in the resulting image.
The camera has limited dynamic range recognition, so post-production can combine multiple photos with different exposures to create photos that show both dark and bright areas in more detail.
Then slowly you will have a process according to how each person handles it.
10 Best Photo Editing Softwares for Beginners in 2020
1. Curves / Tone Curve
It is a powerful tool in image processing software to adjust tones, contrast, light-dark or color for photos. The tool is visually represented as a chart, easy to control andMore will get used to, less will forget.
* Tips: Thói
* Đèn ngủ Yeelight, có móc, nam châm, pin sạc, giá chỉ 269k
2. Saturation & Vibrance
Giving additional color saturation (color saturation) is a common step in post-processing.Saturation affects the intensity of all colors in the image, Vibbrance only affects darker colors, not changing skin tones and saturated colors. I personally rarely use this tool, if any, to adjust each color channel separately if necessary.
This tool is often very newbies, pull for visual satisfaction in color, just feel comfortable, it is difficult to say. A time playing photos and processing photos automatically will automatically adjust the perceived softer natural colors.
* [Trick] How to download standard Windows 10 1903 ISO from Microsoft
3. Sharpening
A tool to improve photo details by increasing sharpness. When using this tool, pay attention to the magnification and distance of the image. These are two factors to keep in mind when making sensory comments about sharpness.A larger image always needs higher sharpness. A photo with low sharpness when zoomed more than it will no longer clearly show the details in the image.
Image viewing distance also affects the visual perception of the image's sharpness.
The closer it is to the image, the more sharpness is needed, the more proportional to the enlargement and observation at a distance. So, when post-processing a sharpen image, note the
4. White Balance
The color of light affects the image. Setting up the WB is a gesture that helps you adjust the recording camera according to the lighting conditions with different color reflections.This can be done in-camera during shooting or may vary in post-processing and will be easier when you shoot RAW images.
5. Highlights, Shadows & Midtones (Histogram)
The brightest area in the image: Highlight; Dark areas: Shadows and everything else is Midtones. Diagrams depicting the pixel distribution in an image based on their brightness or luminosity. The outermost area on the left represents the shadows and the right is highlighted.Learn histogram charts that help you adjust lighting harmoniously for photos, taking advantage of the function of the score 1 Curves / Tone Curve more.
10 Best Photo Editing Softwares for Beginners in 2020
6. Noise
The Noise tool helps to reduce the noise somewhat during post-editing, and sometimes a small amount of noise can improve sharpness.
7. Blending
The image depth (Dof) is thicker and the whole scene is mixed.
8. Masking
Learn and master the use of this tool to help you quickly improve post-production techniques.
9. Dodging & Burning
It is a technique to lighten the tones and darken the tones as you like.This technique is more often used in black-and-white photos, aiming to direct the viewer's attention to one topic while reducing distractions on other sub-topics.
10. HDR (High Dynamic Range)
The camera has limited dynamic range recognition, so post-production can combine multiple photos with different exposures to create photos that show both dark and bright areas in more detail.
NEW ARRIVALS TO BUY NOW:
Nhận xét
Đăng nhận xét